In this tutorial, you’ll discover how to use the example settings included with your FX Magnetic software purchase. We’ll explore how these settings serve as a complete trading strategy and offer an excellent way to experience the software’s capabilities in live trading. We’ll also cover important points to help set the right expectations.
Understanding Example Settings
Unlike the bonus Cheat Sheet that’s useful for developing and backtesting your own FxMagnetic trading strategy, the Example Settings is considered a complete strategy.
The settings include everything from the indicator setting inputs to parameter values. Keep in mind that like every other strategy, its performance may still vary depending on different market conditions.
The good news is, you can fine-tune it further. In fact, you can create different strategies based on the example settings later on.
To get started, access your example setting in the Your FxMagnetic™ Bonuses email received after the purchase.
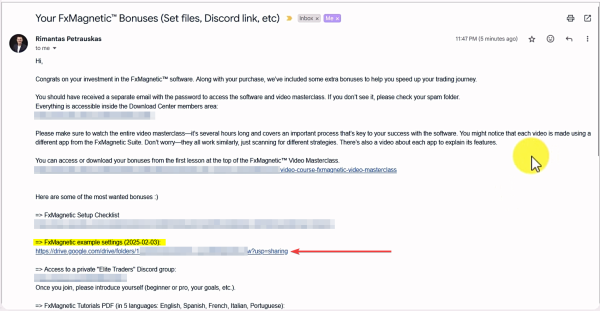
You should see the example setting screenshot upon opening it.
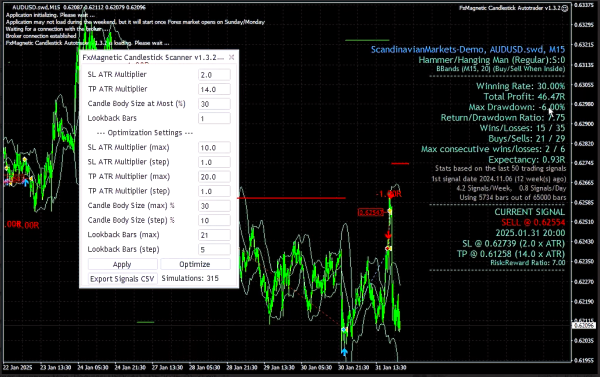
The example settings you will get are based on the software you purchased (RSI, BB, MACD, Candlestick Labs, etc.).
How To Implement
It’s important that you’ve covered the basics of how your FxMagnetic software works. If you did, you’ll find the example settings easy to use.
(If you haven’t covered it yet, you can head to the FxMagnetic tutorial section and search “Discover”.)
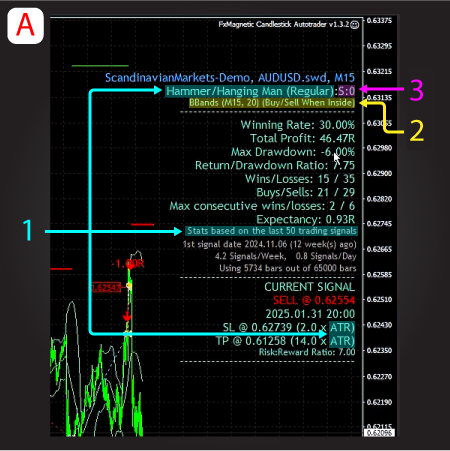
Going back to the example setting screenshot, there are two areas that need your focus:
- Information Display: This is where you’ll find what input to choose in the Indicator Settings Panel.
- Parameter Input Panel: This is where you’ll find the Parameter Values.
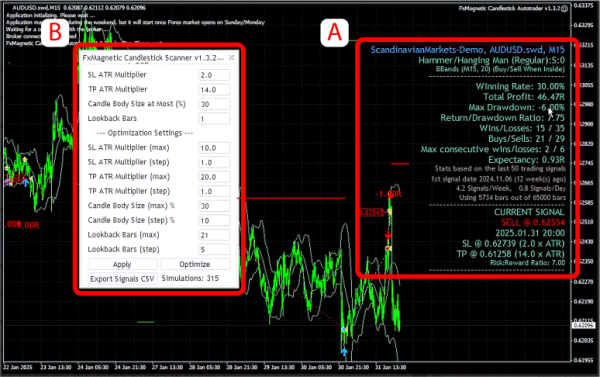
Information Display
The information display shows the statistics of the FxMagnetic strategy you are running. It also gives clues to what combination of indicator settings you should used for the strategy.
Before we dive into implementing the settings, you need to access the indicator settings panel first. To do this:
- Simply drag and drop the FxMagnetic Scanner from the Navigator panel to your chart.
- If it’s already attached, you can open it by pressing CTRL+I or Right Click > Indicators List, then double click the indicator.
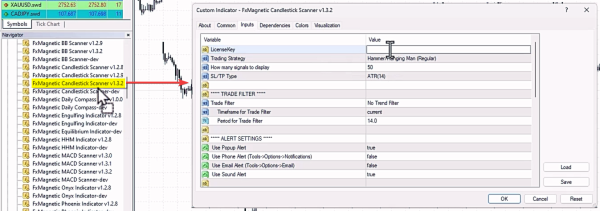
For this tutorial, we will use the example settings for Candlestick Lab’s Hammer/Hanging Man (HHM) strategy with the AUDUSD chart. Don’t worry if you’re using a different FxMagnetic software as they all follow a similar structure.
- Setting Up The Trading Strategy
- Choose the Hammer/Hanging Man (Regular) mode for Trading Strategy.
- Set How many signals to display to 50 as indicated in the Stats based on the last 50 trading signals.
- Choose ATR(14) for SL/TP Type.
- If the example settings show PIPS, it means the current selected setting is Fixed, not ATR(14).
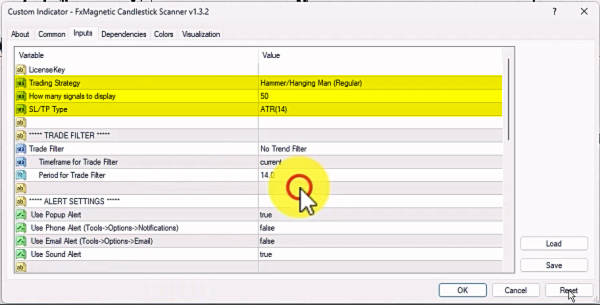
- If the example settings show PIPS, it means the current selected setting is Fixed, not ATR(14).
- Setting Up The Trade Filter
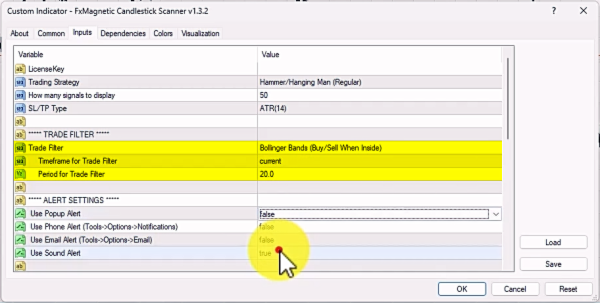
- For Trade Filter select ‘BBands’. Specifically, the (Buy/Sell When Inside) mode.
- The first of the two values contained in the following parentheses is the Timeframe for Trade Filter which is m15 or 15 minute timeframe.
- Choosing current will auto select the current timeframe of the chart.
- Alternatively, you can choose a specific timeframe in the drop down.
- The second of the 2 values contained in the following parenthesis is the Period for Trade Filter which is 20.
- Setting Up The Pattern Flexibility
-
- For Pattern Flexibility Selector, choose S.
- S means strict, while F means flexible.
- You can read more about Pattern Flexibility here.
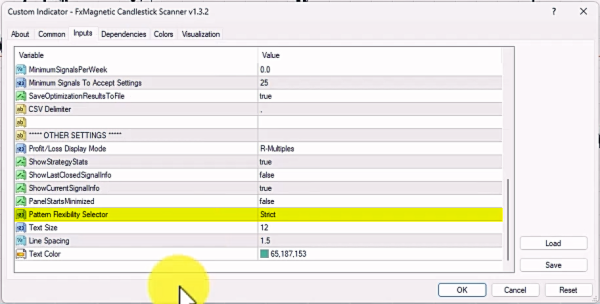
- For Pattern Flexibility Selector, choose S.
Lastly, we suggest you turn off (or set to false) all of the ALERT SETTINGS during this test. Apart from this, no other settings need to be changed.
Parameter Input Panel
Once you are done with the Indicator Settings, you can click Ok. Doing this will launch the Input Panel where your next step is to copy the values from the example settings to your MT4. It’s that simple.
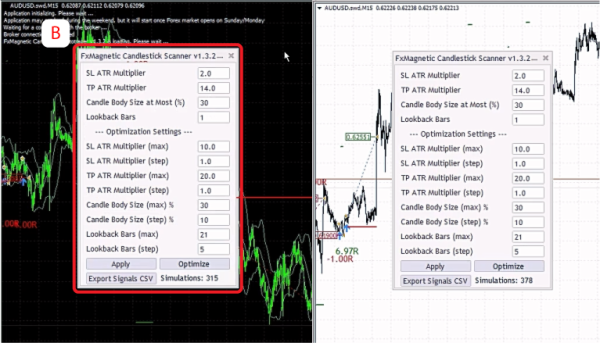
Testing The Parameters
As soon as you click Apply, the FxMagnetic Scanner will instantly run a backtest and display the stats on the information display. From here, you will see how the example settings perform right away.

This feature is helpful, not only to quickly show you the stats, but to also show the potential difference in the result, which is expected for two possible reasons:
- The example settings are generated and sent every Monday before the New York session. Therefore, if the settings are applied a day after, the results might slightly differ.
- The difference in the data feed between brokers.
Keep in mind that getting a slightly different result is fine as long as your overall winning rate, losing rate, and drawdown is at an acceptable level.
Tips for Success
- Do not use these settings without learning the basics of the software.
- The example setting is a complete strategy in itself BUT you have the freedom to fine tune it or create other strategies out of it.
- This is NOT meant to be a shortcut nor a holy grail. The example setting is created to help speed up your trading progress.
- Like every strategy, its performance will vary depending on the current market condition.
- Try to document its results and track its stats. Take the opportunity to learn how it works.
- The example setting is normally sent once after purchase. If you find it helpful and time saving, you can always join the FxMagnetic Insider Club where you can receive a fresh and updated set of settings every Monday.
