In this tutorial, we will explore how to effectively use the Autotrader to automate the trading strategies you create with any FxMagnetic software (RSI, BB, MACD, etc.). Discover how it works, how it can speed your strategy optimization and development, and how you can save time through automation.
This guide is created for new and experienced users of FxMagnetic software who want to move from manual to automated trading while maintaining full control over their strategy execution.
Initial Setup Checklist
Before starting with the Autotrader, ensure you have:
- Your FX Magnetic scanner installed
- MetaTrader 4 platform properly configured
- Your unique license key ready
Tip: You can check our How to Install FX Magnetic Software tutorial for detailed installation and metatrader configuration instructions.
What Is the FX Magnetic Autotrader?
The Autotrader is the second of two software components which comes with any FX Magnetic software. Important things to understand:
- Works in tandem with FX Magnetic scanners and won’t work without it
- Each scanner (Candlestick, MACD, RSI, BB, etc.) has its dedicated Autotrader
- Executes trades based on scanner signals automatically
- Makes trading more mechanical, eliminating emotional interference
- Is not a “black box” or a Quant system
Remember, you need to develop a profitable trading strategy using the FxMagnetic scanner first before running the Autotrader.
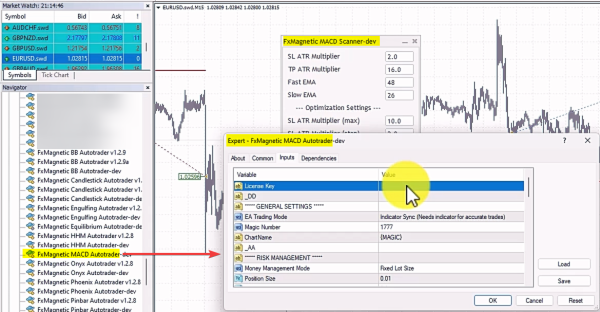
To use the Autotrader, you need to set it up first. The following sections will explain what these settings are.
General Settings
EA Trading Mode
Determines how the Autotrader will interact with the scanner and how it will identify the strategies it is running.
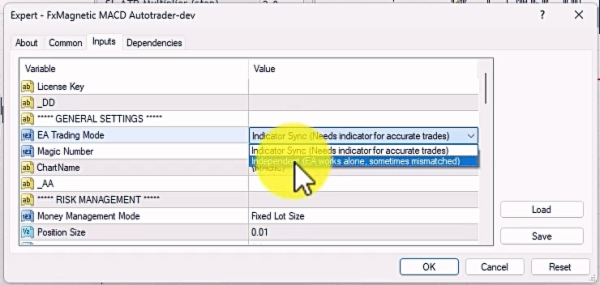
- Indicator Sync is selected by default. This means that the scanner will work side-by-side with the Autotrader to execute trades automatically.
- Independent mode is an option where you can run the Autotrader without needing signals from the scanner. More on this later.
Magic Numbers
The magic number is an identification that you can assign to each automation running across different charts. There is no hard and fast rule in choosing what number, so we encourage you to create your own numbering system.
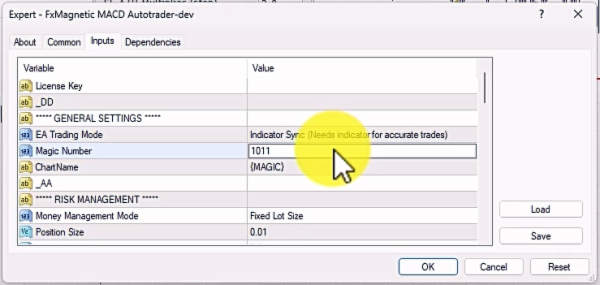
Examples:
- 1001: Autotrader for EUR/USD 1-hour chart
- 1502: Autotrader for GBP/USD 15-minute chart
- 2403: Autotrader for USD/JPY 4-hour chart
Chart Name
This lets you set a custom label or name on the chart. By default, it displays “{MAGIC}” which auto-displays the magic number. You can change this to something like “Strategy Name {MAGIC}” which will show the name you picked for your strategy and the magic number.
Risk Management Settings
FxMagnetic Autotrader comes with risk management settings built into the software to help mitigate losses and preserve your capital.
Money Management Mode
You have two options:
- Fixed Lot Size: The predetermined lot size will be applied to every trade.
- Pros: No computation needed
- Cons: Risk varies per stop loss, increasing chances of hitting your drawdown sooner
- Risk Per Trade (%): Provides more control over potential loss per trade, giving you a greater chance to preserve your capital.
- Pros: Easier to track with less chance of one single trade hitting your drawdown
- Cons: Risk may need to be recomputed as your equity curve moves
Position Size
Value input for Money Management Mode.
- For Fixed Lot Size: Enter lot size in decimals (Example: 0.01 = 0.01 lots)
- For Risk Per Trade: Enter percentage in whole numbers (Example: 1.0 = 1%)
Account Balance Simulation
This feature lets you test multiple strategies using a simulated balance different from your actual account balance. We recommend setting a balance equal to or lower than your actual account for more realistic test results.
Trailing Stop Features
- Trailing Stop Value (Pips) moves your stop loss to maintain a set distance as price moves in your favor. The stop loss first moves to break-even when profit reaches the set pip value, then continues to move preserving that distance. Note that setting Trailing Stop Value to zero disables this feature.
- Instant Trailing Stop starts the trailing process immediately when the trade opens, instead of waiting to reach a certain profit level first. Can be set to True or False.
Multiple Position Settings
This feature splits a single trade entry into multiple positions on a single trade.
How Many Positions
Determines how you split one trade. This feature is tied to Money Management Mode.
- Example: Instead of entering 1 buy position with 1% risk in USD/JPY at 150.500 price level, you trade 4 long positions of 0.25% each at the same price level.
Take Profit Multiplier
Controls how far each position can run. A multiplier of 1 means a 50 pip take-profit remains as is. Set it to 2 and it becomes 100 pips, and so on.
Close & Pause Trading If Settings
A ‘condition-based’ feature to further help mitigate risk and minimize losses. There are 3 sections under this.
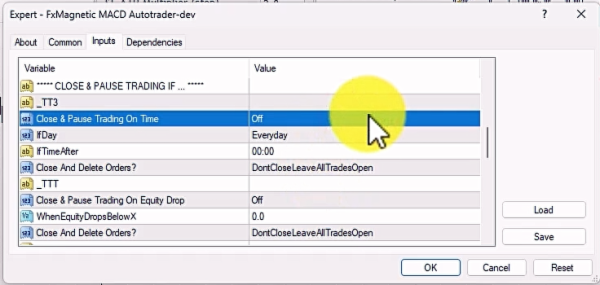
Time Based Condition
Lets you specify the day and time as a hard stop which closes or pauses your trading once reached.
- Close & Pause Trading On Time: Activates or deactivates the condition
- If Day: Lets you select the day
- If Time After: Lets you select the time
- Close And Delete Orders?: Lets you close trades based on the conditions above
Equity Based Condition
Lets you specify the amount value as a hard stop which closes or pauses your trading once reached.
- Close & Pause Trading On Equity Drop: Activates or deactivates the condition
- When Equity Drops Below X: Set the amount as your hard stop
- Close And Delete Orders?: Lets you close trades based on the conditions above
Win Rate Based Condition
Lets you specify the win rate percentage value as a hard stop which closes or pauses your trading once reached.
- Close & Pause Trading On Win Rate Drop: Activates or deactivates the condition
- If Win Rate Falls Below X (%): Set the percentage value as your hard stop
- Close And Delete Orders?: Lets you close trades based on the conditions above
Independent Mode Settings
When you switch from Indicator Sync mode to Independent mode, you’re telling the Autotrader to operate without needing signals from the scanner. However, you would need to manually enter the values similar to how you do with the scanner.

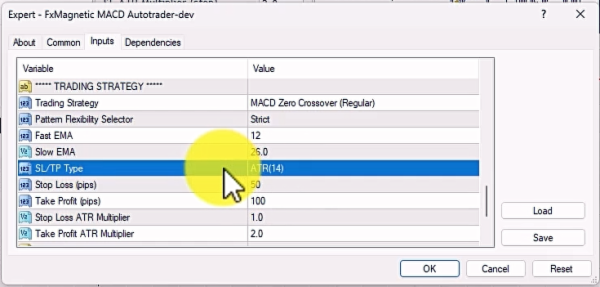
Since each scanner comes with its own Autotrader, the settings may vary.
Monitoring Tools
Issues can happen at any moment and can be caused by anything. The good news is MetaTrader has tracking features which could help determine potential causes.

Experts Logs
Found under the Terminal Panel, it logs any errors with the EA. You can access this by going to View > Terminal or by pressing Ctrl + T on the keyboard.
Right-click inside and choose View to launch the MT4 EA message logs.
Journal Logs
Also found under the Terminal Panel, it logs any errors with your broker, internet connectivity, or computer. You can access this by going to View > Terminal or by pressing Ctrl + T on the keyboard.
Right-click inside and choose Open to launch the folder containing all MetaTrader Terminal log files.
Note: The information or files you’ll find here are crucial in solving problems or reporting issues to us or your broker.
Tips for Success
- Broker symbols differ from one another. Some have prefixes, some suffixes. Make sure you are using the symbol specific to your broker to avoid errors.
- If you plan on using auto trading, inquire with your broker first if they support it because not all of them do.
- FxMagnetic Autotrader is an amazing tool to run the strategies you created with any FxMagnetic scanner. But remember that you need to create the strategies first.
- Even with auto trading, always exercise strict money and risk management.
- Always default to conservative risk settings of <1%.
- The success of the Autotrader relies on a proven working strategy that has gone through rigorous backtesting and forward testing. You cannot automate a bad strategy and expect it to win.
- Monitoring and reviewing your trade statistics and performance is key to improving, auto trading or not.
