This a quick set-up guide on how to download, install, and configure the FxMagnetic Indicator.
Introduction to FxMagnetic
FxMagnetic is an easy-to-use set of candlestick indicators that help traders spot profitable trading opportunities on the MetaTrader 4 platform. FxMagnetic is designed to guide you through finding the best setups for your trades on any currency pair and timeframe to increase your chances of success.
-
With FxMagnetic HHM, you’ll easily identify key patterns like the Hammer, Hanging Man, and Pinbar.
-
FxMagnetic STAR points out potentially lucrative patterns such as the Morning Star, Evening Star, Inverted Hammer, and Shooting Star.
-
FxMagnetic Engulfing helps you spot when a big market shift is about to happen with Bullish and Bearish Engulfing patterns.
Each indicator comes with clear recommendations for stop-loss and take-profit levels that make it simpler for you to manage your trades and protect your investments.
For the purpose of this guide, we’ll focus on the FxMagnetic Engulfing Indicator. It is important to note that the setup steps detailed below apply to each FxMagnetic indicator unless stated otherwise.
FxMagnetic: Value Proposition
Below are some of the main reasons why the FxMagnetic is a great addition to your trading arsenal.
Intelligent Pattern Recognition:
FxMagnetic has the ability to intelligently spot Engulfing, HHM, and STAR patterns to grant you the insight to make informed decisions.
-
Engulfing Pattern Recognition: FxMagnetic allows you to spot engulfing patterns. It helps you spot these powerful patterns as they form, whether they’re bullish or bearish.
-
HHM Pattern Recognition: The FxMagnetic HHM Indicator catches the Hammer and Hanging Man patterns, as well as the Pinbar patterns. These patterns can give you a heads-up about the potential market bottoms and tops.
-
STAR Pattern Recognition: With the FxMagnetic STAR indicator, you’ll identify key patterns like Morning Stars, Evening Stars, Shooting Stars, and Inverted Hammer. These can be early signs of major shifts in market direction.
Strategic Trading Approach:
FxMagnetic also helps you optimize your trading strategy. With its advanced optimization function, you can fine-tune your Stop Loss (SL) and Take Profit (TP) settings to customize your risk management. With FxMagnetic, you can create a strategy that aligns with your trading style and risk appetite.
Real-Time Back Testing:
FxMagnetic has a Real-Time Back Testing feature that allows you to analyze the performance of previous signals.
Customizable Trading Directions:
Whether you prefer to buy, sell, or engage in both, the FxMagnetic is fully customizable to suit your trading direction.
Statistical Edge:
The built-in win rate and other essential stats provide you with all the metrics you need to assess your trading edge.
Instant Notifications:
FxMagnetic also sends notifications directly to your email or phone, making sure you’re on top of every potentially profitable trade.
Autotrading Integration:
For those who prefer an automated trading experience, FxMagnetic also offers Autotrader that automates trade entries and exits based on the settings configured in the indicator.
Market Adaptability:
The FxMagnetic is designed to adjust to changing market conditions, which enables it to help you safeguard your strategy against unexpected circumstances.
How to Download and Install the FxMagnetic
Before you begin the installation process, ensure you have:
-
A stable internet connection.
-
The latest version of MetaTrader 4 (MT4) installed.
Downloading the FxMagnetic Engulfing Indicator
-
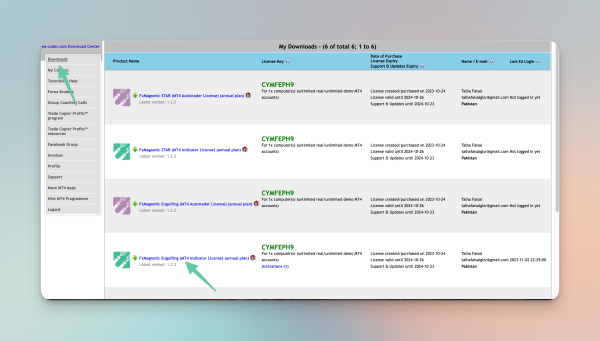
Navigate to the Downloads section and locate the FxMagnetic Engulfing indicator.
-
Download the FxMagnetic Engulfing Indicator.
-
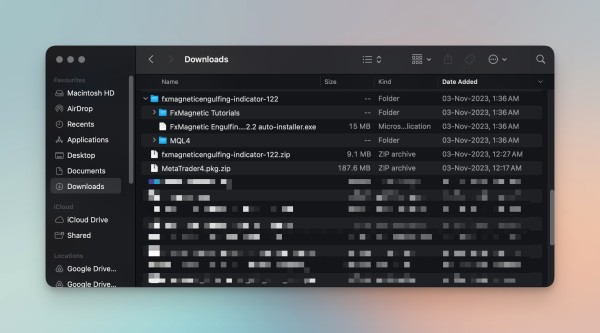
Once downloaded, locate the file, and extract it.
Installing the FxMagnetic Engulfing Indicator
After you’ve downloaded and extracted the file, there are two ways through which you can install your FxMagnetic Indicator.
Process 1: Automatically Install
-
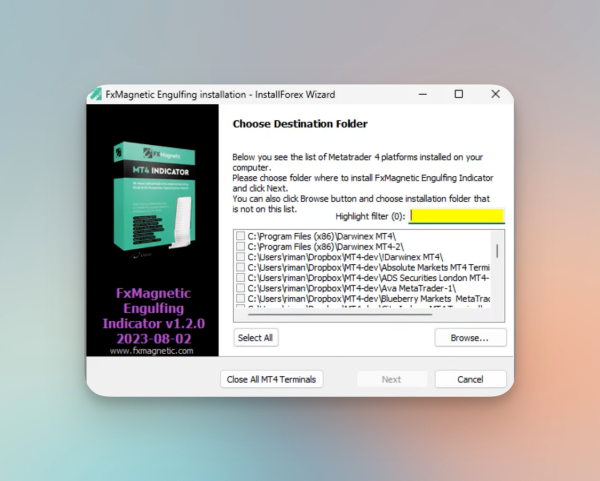
Simply, double-click on the .exe file and it automatically downloads.
-
Finalize the installation by agreeing to the terms & conditions, and choosing the destination file.
INFO: The destination file denotes the Metatrader platform where you want to install the indicator. You can use the Highlight Filter feature to locate the platform you are searching for.
Process 2: Copy-paste the MQL 4 file
-
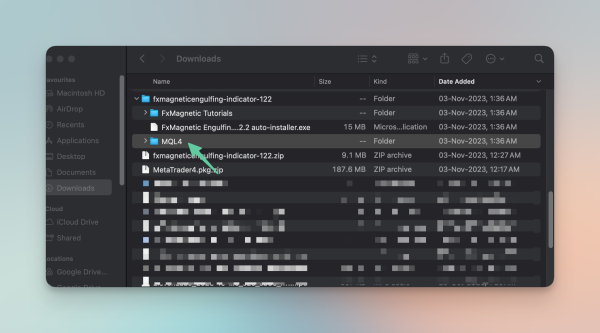
Navigate to the extracted files and copy the MQL4 file.
-
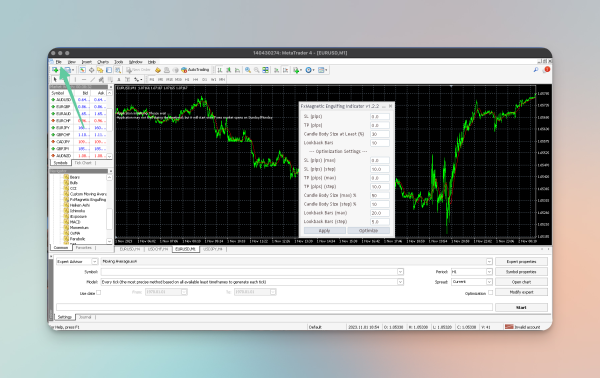
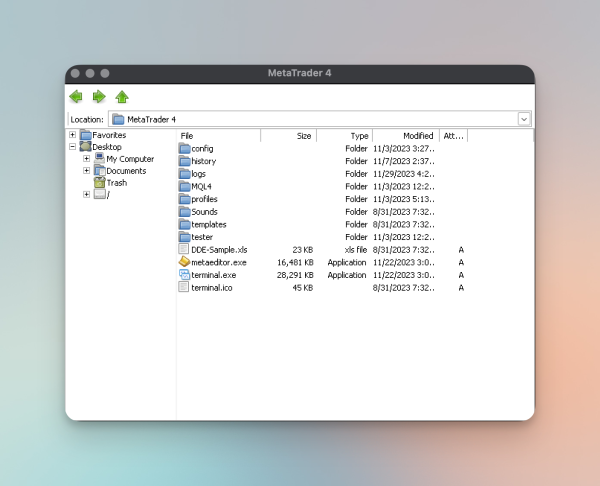
Navigate to your MetaTrader 4 and go to File.
-
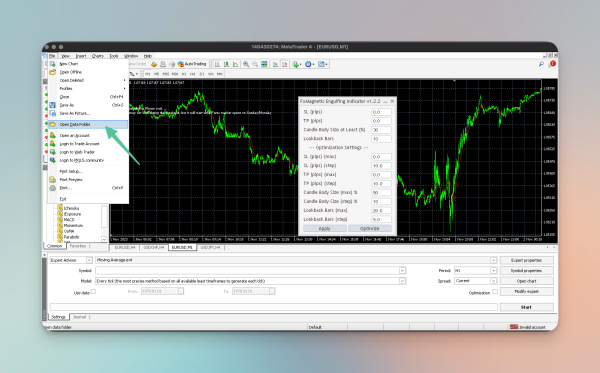
Open Data Folder.
-
Paste the MQL4 file in the Data Folder.
-
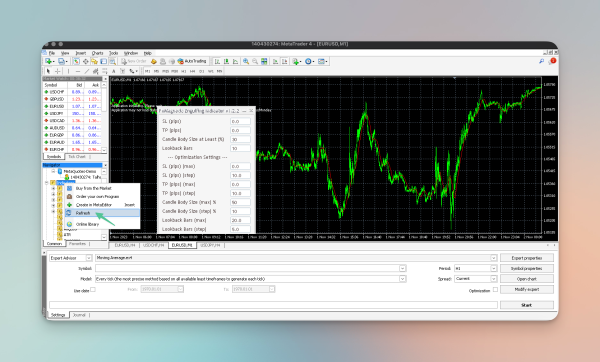
Go to the Navigator pane and refresh Indicators. The FxMagnetic Engulfing Indicator should now appear along with your other indicators.
Execute the FxMagnetic Indicator
NOTE: Only one indicator per chart is permissible.
Allow DLL Imports
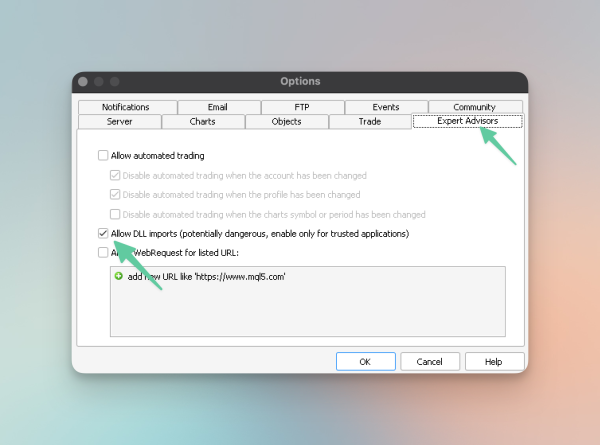
An important step to complete before executing the FxMagnetic Indicator is to ensure the Allow DLL Imports option is enabled in the MetaTrader 4 settings.
To enable Allow DLL Imports, follow the steps below:
-
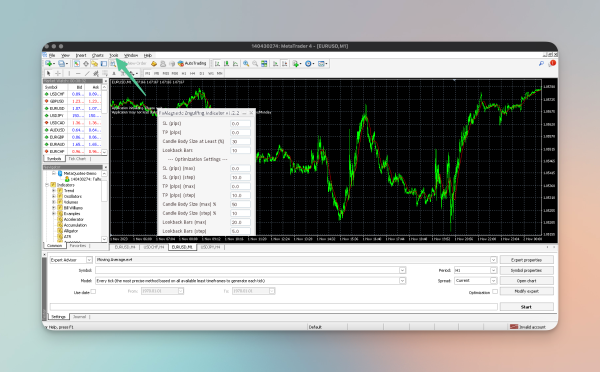
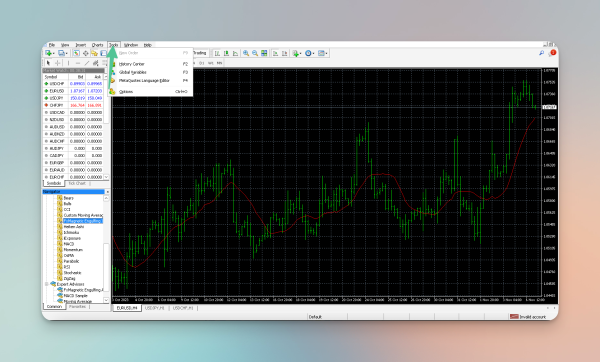
Go to Tools.
-
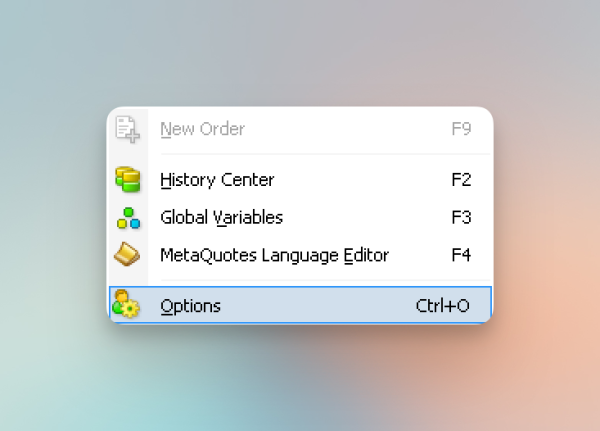
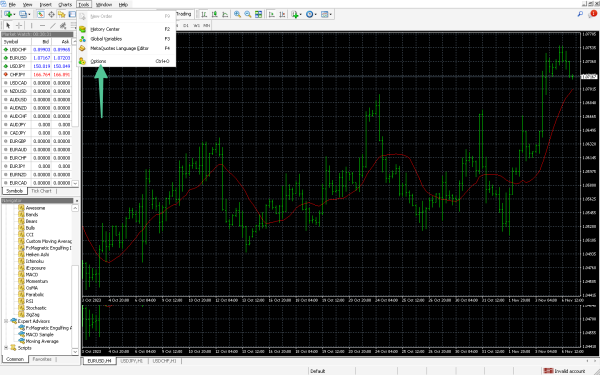
Click on Options.
-
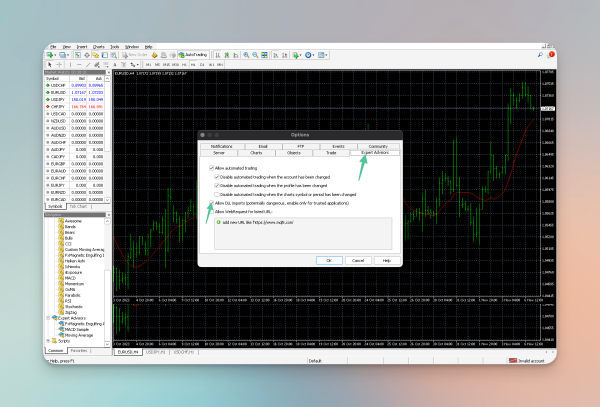
Under Expert Advisors, tick Allow DLL Imports and press OK to enable the setting.
License Key Activation
To activate the FxMagnetic Engulfing Indicator, follow the steps below:
-
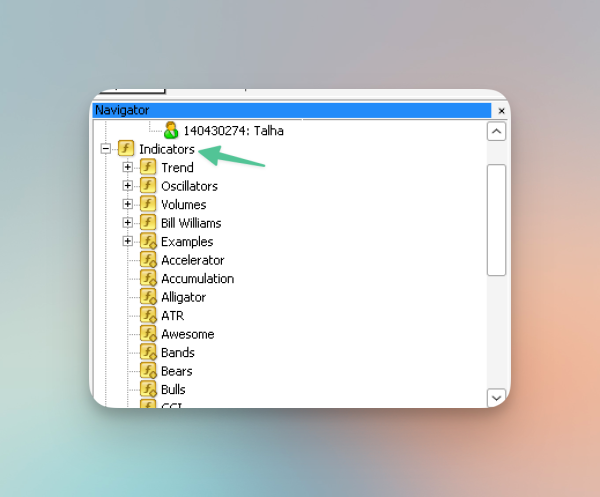
Open MetaTrader 4 and go to the Navigator pane.
-
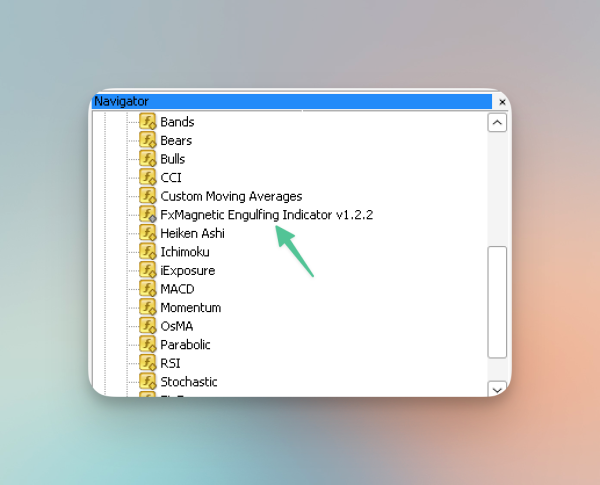
Under Indicators, locate FxMagnetic.
-
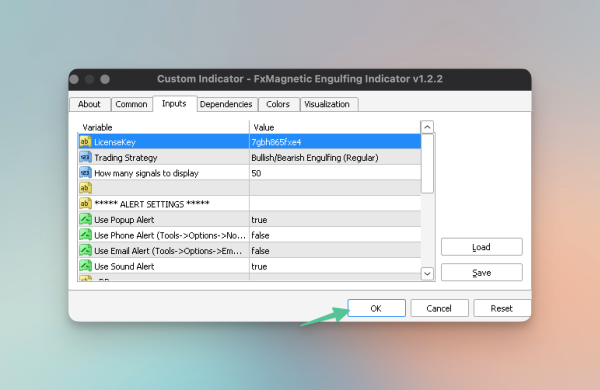
Once you click on it, a settings window will appear.
-
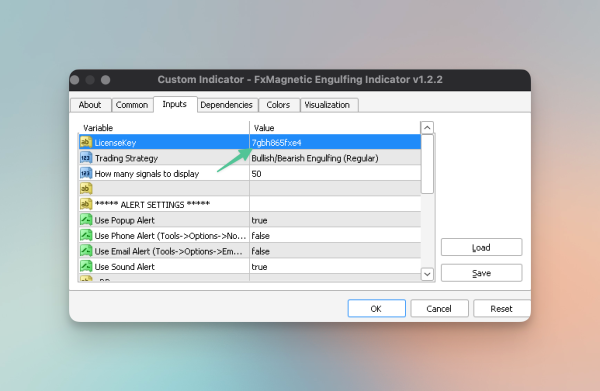
Go to Inputs and enter your unique license key in the License Key field.

-
Click OK to activate the indicator.
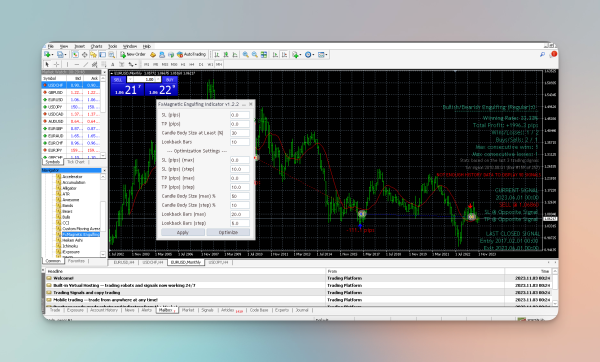
Once you’ve activated the FxMagnetic Engulfing Indicator, you’ll be able to see statistics on the right-hand side of your chart, as shown below:
History Data for the Indicator
FxMagnetic uses data to generate statistics and improve your trading experience. If enough history data isn’t available, the indicator might not function at its optimal level. “Not enough data” is a common hurdle that most beginner traders face. Here’s how you can download history data for your FxMagnetic Indicator in order to get the best results.
Manual Download
The simplest and most effective way to download data is to download it from your broker. Follow the steps detailed below to load history data on your chart.
-
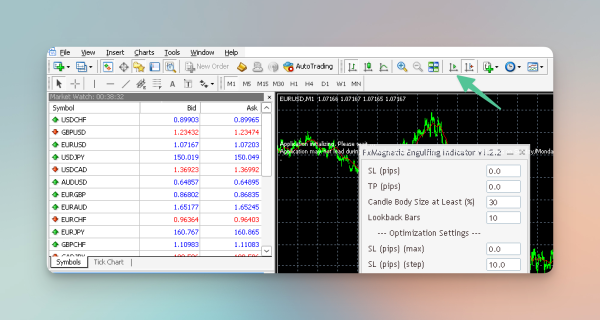
Disable the auto-scroll feature to enable smooth scrolling.
-
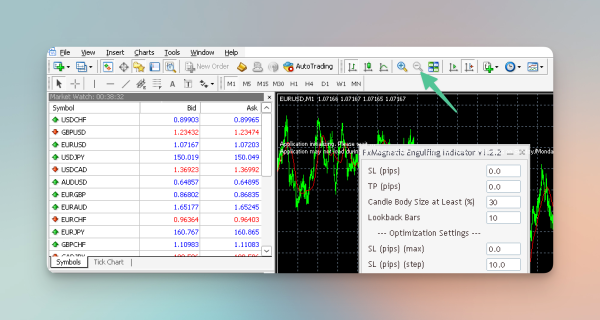
Zoom out for a better view.
-
Scroll back the chart to the maximum extent by either pressing on the Home key or the Up key. This action prompts your MT4 to automatically download history data from your broker.
Download Data from the History Center
If manually scrolling doesn’t populate the data you need, the next step is to download it directly from the History Center (a repository of history data for various currency pairs).
-
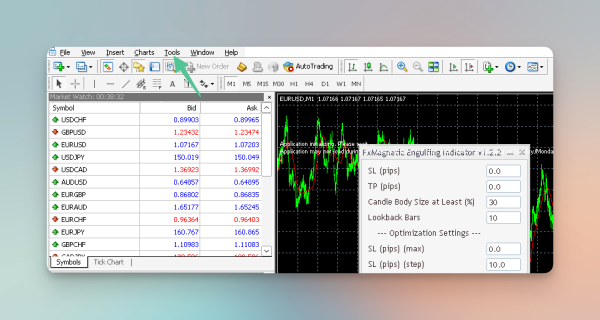
Navigate to the Tools section.
-
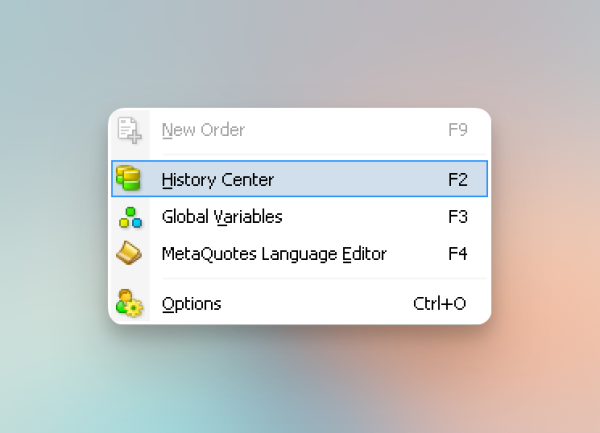
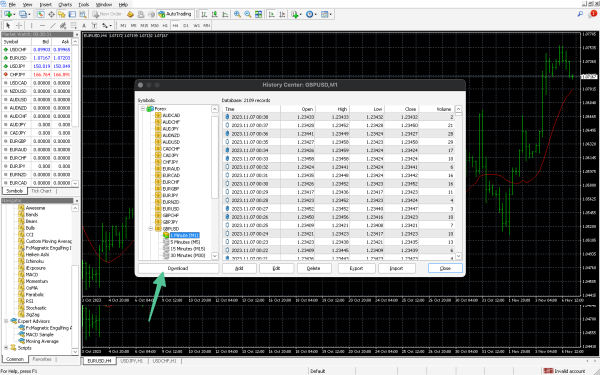
Under Tools, find History Center and click on it.
-
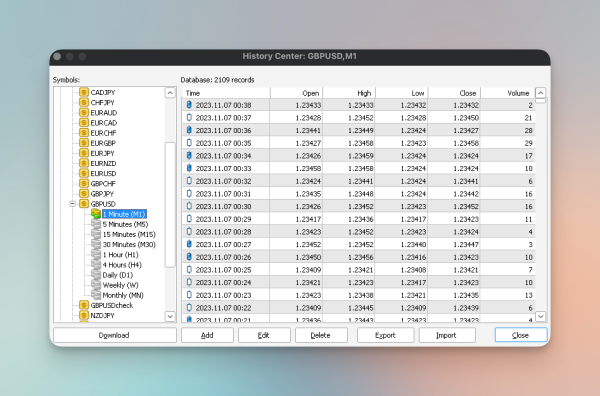
Select the currency pair and timeframe you want the data on.
-
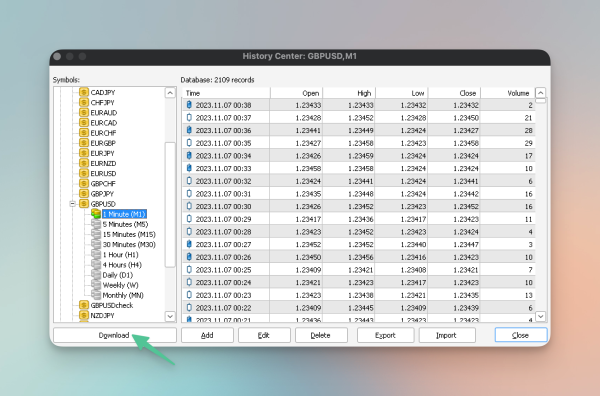
Once you’ve selected the currency pair and timeframe, press Download.
Configure the FxMagnetic Indicator
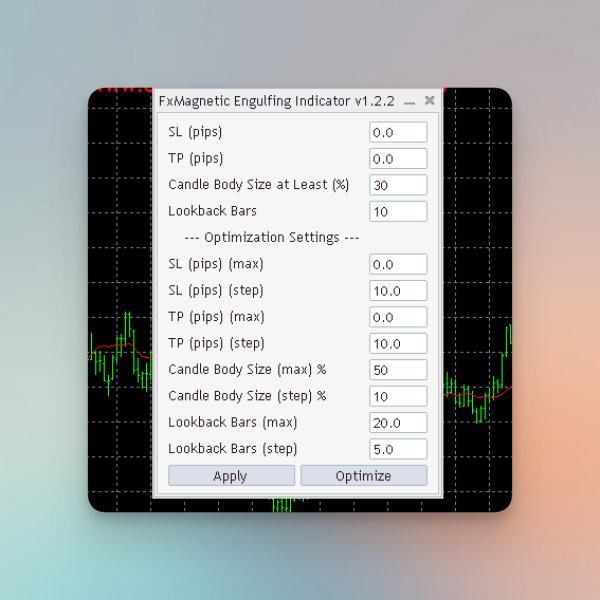
When configuring the FxMagnetic Indicator, there are various settings and customizations that you can make to achieve your desired trading strategy. Below are five of the most important settings that’ll come your way:
Stop-Loss
By setting the SL at a certain point, you’re instructing the indicator to sell when the price reaches a certain point. It’s designed to limit loss on a trade.
Take-Profit
By setting the TP at a certain point, you’re instructing the indicator to close the trade when the price reaches a level that gives a satisfactory profit.
Lookback Bars
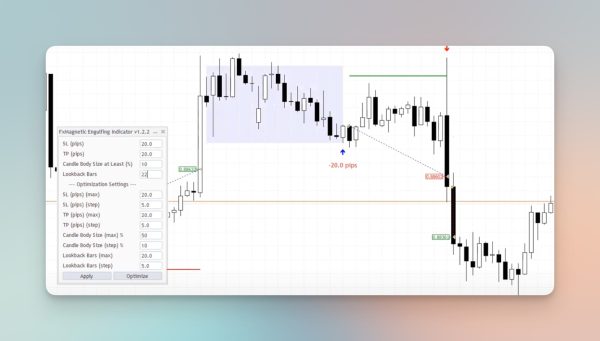
FxMagnetic uses Lookback Bars to detect if the pattern is at the top or bottom of the trend. It scans previous X bars before the pattern to check if the pattern appeared at the bottom or top of that specific bar range. If you set Lookback bars to 1, FxMagnetic will show patterns regardless of where they appear. If you set that to 20 bars, for example, it will show only patterns that appear at the top or bottom of those last 20 bars.
Candle Body Size (CBS) Parameter
Imagine a candlestick as a real candle. The thick part in the middle is the body, and the thin lines sticking out from the top and bottom are the wicks.
-
CBS at Least: This is like saying the body of our candle needs to be a certain chunkiness, at the very least. So, if we have a rule saying “CBS at Least 30%”, it’s like saying the thick part of our candle (the body) must be at least 30% of the whole candle (including the thin wicks). If our whole candle is the size of 100, then the thick part (body) should be at least 30.
-
CBS at Most: This is the opposite. It’s saying the body of our candle can’t be too chunky. Using the “CBS at Most 30%” rule means the thick part of our candle shouldn’t be more than 30% of the whole candle. So, if the whole candle is 100, then the thick part shouldn’t be more than 30.
Pattern Flexibility Selector (PFS)
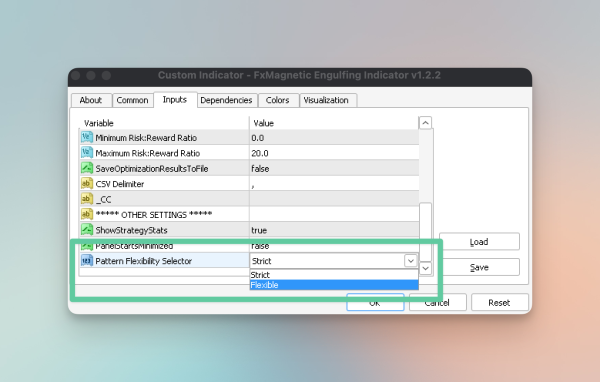
Now with the context of CBS in mind, think of PFS as a strict teacher (Strict mode) vs. a lenient teacher (Flexible mode):
-
Strict Mode: The strict teacher has very specific rules. For instance, they might have a rule that says the body of the candle has to be much smaller than the bottom wick, by at least two times. So even if we have a rule saying “CBS at Most 80%”, the strict teacher will ignore it if it doesn’t match their specific requirements.
-
Flexible Mode: The lenient teacher is more relaxed. They’re willing to overlook some rules. So in this mode, even if the body isn’t two times smaller than the bottom wick, it’s okay. This means with this lenient teacher, our “CBS at Most” rules over 50% can be applied more often. However, the patterns found this way might not be the “perfect” patterns.
In short, the parameters help decide how chunky the body of our candlestick should be, and the PFS decides how strict or relaxed we want to be with these rules.
Common Issues with Set-Up
Addressing Anti-Virus and Windows Protection Alerts
When downloading and installing FxMagnetic, you might encounter alerts from your anti-virus or Windows protection system. These are often false positives. To proceed, you will need to inform your web browser or protection system that the file is safe and should be kept.
Allowing DLL Imports and Enabling Automated Trading
In the MetaTrader application,
-
Navigate to Tools
-
Then click on Options
-
Then select Expert Advisors. Here, make sure to check the option for Allow DLL imports. This setting is necessary for both the FxMagnetic Indicator and Autotrader (EA) functionality.
-
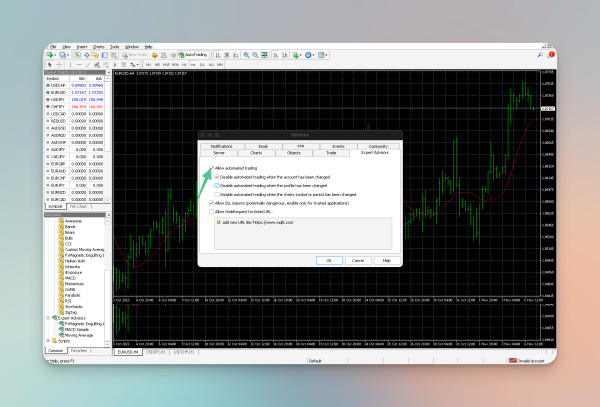
If you are using Autotrader (EA), you also need to enable Allow Automated Trading in the same settings window.
Ensuring Sufficient Historical Data
The amount of historical data available on your chart can affect the performance of FxMagnetic. Not all brokers provide the same amount of historical data and that can lead to a lack of signals. To ensure you have enough data, you can download more historical data from the History Center which is found in the Tools section.
The amount of data required depends on the number of signals you wish to see. For example, for 25 signals, you need approximately 20,000 bars; for 50 signals, 30,000 bars; and for 100 signals, around 60,000 bars.
Attaching the FxMagnetic Indicator Correctly
A vital step in using the FxMagnetic indicator is attaching it properly to your charts. To do this, open the desired chart in your MetaTrader application, then drag and drop the FxMagnetic indicator from the Navigator panel to the chart. Ensure that you attach the indicator only once per chart to avoid conflicts or performance issues.
Interpreting Error Messages and Resolving Common DLL Library Issues
If you encounter problems after attaching the indicator, check the ‘EXPERTS’ tab at the bottom of the MetaTrader application. This tab logs all activities of your Expert Advisors and indicators, including error messages. These messages can provide valuable clues about what might be going wrong. If the problem relates to DLL files, ensure that the DLL library file is present in the correct folder within your MetaTrader installation directory. The typical path is MQL4/Libraries. If the file is missing, you need to copy it from the original FxMagnetic package to this folder.
In addition, if you have chosen the manual installation method, a common issue is forgetting to copy the DLL library file to your MetaTrader directory. This results in an error message indicating that the required DLL file is missing. In this case, you need to ensure that you copy the DLL library file to your MetaTrader directory.
Ensure the Computer Stays On
The monitor may enter sleep mode; however, the computer must remain continuously active with MT4 running and the Expert Advisor (EA) operational on the chart. If the computer enters sleep mode, goes offline, or is powered off, FxMagnetic will be unable to function.
Broker Data Paradox
It’s important to understand that different brokers may show different results when using FxMagnetic. This variation is due to two main factors: price differences and the availability of historical data. Each broker might source their data from different liquidity providers, leading to slight discrepancies in price. Additionally, the amount of historical data provided by brokers can vary significantly.
Solutions for Inconsistent Data:
-
Using the History Data Center: If your broker does not provide sufficient historical data, you can download more data through the History Data Center in MetaTrader. This additional data can help FxMagnetic perform more accurately by giving it a broader dataset to analyze.
-
Employing Local Trade Copier: If you are using FxMagnetic with one broker but wish to replicate trades with another, consider using a Local Trade Copier like www.mt4copier.com. This tool allows you to copy trades from one MetaTrader account to another, bridging the gap between different brokers.
Wrapping Up
And there you have it – a quick guide on setting up your FxMagnetic Indicator.
With the FxMagnetic Engulfing Indicator, you are well-equipped to navigate the complexities of the market with enhanced insight.
We encourage you to make the FxMagnetic Engulfing Indicator a core part of your trading process. Integrate it into your MetaTrader 4 platform, and let it serve as a vital tool in achieving your trading objectives.
Needless to say, this is just the tip of the iceberg, and there’s way more to FxMagnetic, which we’re excited to explore in our next chapters.
Stay tuned!
Next Chapter: Parameter Optimization Matrix in FxMagnetic
